Okay. So I am not good with keeping up with this Blog, but to be honest, I really haven't cooked anything particularly special lately. Not sure why. I guess I lost my sense of culinary adventure. Well coming up in the next few weeks, things should get exciting. I've been stockpiling pins on Pinterest and really need to start trying them out.
Friday, December 7, 2012
Wednesday, October 10, 2012
Fall is here!
Hello, my friends! It's been a busy few weeks, but I won't bore you with that.

In some fun news, I (and by that, I mean my mother) found this awesome little critter in the herb garden. He was mowing away at the parsley. After a quick google search, he appears to be a swallowtail butterfly! That's fun! I wasn't able to find him a few days ago. I hope a bird didn't snatch him!

I also cooked up some delicious chili. This was a play on Wendy's Chili. They only thing I had to change was with the beans. I could not find ranch style beans. I substituted the 2 cans for pinto beans with jalapenos of the same size can. It had enough kick to notice, but wasn't overbearing. I will be making this again, only I will half the recipe next time. (That chili is in the biggest pot in the house and was pretty full!)

I really need to learn to take better/more pictures of the food while I am cooking it to better show the process. Although it doesn't look like it, that there is a pork chop. A. Chocolate. Spiced. Pork. Chop. I love Paula Deen. When I make this, I normally double up the spice rub. I'm not sure if Paula's chops are just smaller than the ones I end up getting, or if I just love the concept of putting a chocolate spice rub on my pork entirely too much. I also decided this time to cut out the heat of the recipe and did not use the crushed red pepper. Either way you do it, it is totally worth it. I paired it up with a cute bit of salad and roasted broccoli.
Now I have recently discovered the wonders of Pinterest. Not sure if this is good or not. It certainly can consume a lot of time. I was all over, looking at recipes for food and drinks, going through ways to enhance my green thumb, and even looking for some new projects to start. Now that it has taken over a lot of my free time I have been able to familiarize myself with Pinterest, I have been able to find things that satisfy my current tastes.
I am not sure where you are from, but here in Pennsylvania, it is quickly starting to chill down. I love it. Everything about fall (except the change of season cold I normally get) is just so comforting. Plus I know then that winter is right around the corner. I can't wait for some snow! Or I can, but only until after my snow tires make their way onto my car.

Now yesterday, being that hoodie season has arrived, I was a bit chilled and decided I wanted soup. I really didn't want to go to the store, so after looking at what I had on hand, I decided to make Broccoli Cheddar Soup. This was my first attempt at a cream based soup. I don't think I quite nailed it down yet, but It was pretty good. This recipe was an attempt to copy Panera's Broccoli Cheddar soup, which is awesome. Not sure how to improve it, but I will make it again. Maybe a different type of cheese? I used extra sharp white cheddar. When I make it again, I will let you know.

Now normally at Panera, they serve their soups with a nice, crusty baguette. Now, I did have the ingredients to attempt a crusty loaf of bread, but I really didn't want to wait the time it takes to make a loaf of bread. I decided biscuits instead. My sister is normally the champion of biscuits in the house, but she was busy, so I had to give it a go. The recipe is pretty straight forward, but I ended up using the high altitude amounts for the baking soda and powder. It just seemed closer to the recipe my sister uses for her biscuits. These are light and flaky. Make them. Now. I'm not kidding. You will thank me.
Wednesday, September 19, 2012
I've been slacking!
I have really been slacking on this blog. Here are some things I've been up to over the past few months while I disappeared off the face of the planet!

Made Chili Molasses Chicken Skewers! They were just a bit spicy for me, but the recipe would be easy to alter to tame it down a little bit. Still delicious. I served it with corn on the cob, grilled up some bread, and I assume that there was potatoes in the foil packet.


I ate some delicious food in Washington, DC while there for my cousin's bachelorette party weekend. The restaurant, Vapiano, was a recommendation by a friend of my sister's, and it was fabulous. I wish I took more pictures of the place, but it was just lovely. It had such a good flow to it, and the staff was super friendly, which is quite appreciated when visiting a big city. The portions were also worth the money. My sister and I split both plates, the top being a chicken caesar salad, and the bottom was pasta with chicken and pesto. So yummy.

While in Washington, DC, we also went to a desert bar called Coco Sala. I wish I could remember what this desert was called, but had I posted this back in July when I went, I might still remember. The plating was just so pretty. I also had an amazing drink called "Fetish." Chocolate covered strawberries. With vodka. Need I say more?

Made BBQ chicken (with the amazing Dr. Pepper BBQ sauce), potatoes and asparagus on the grill!

Along comes my sister's birthday cake.
Yes. That is a Tardis. And yes. There are Doctor Who figurines on the cake. It was all fun and games until the Tardis basically tipped over.
***Note to self. Do not use Funfetti cake to build a theme cake***

I spiked a watermelon! This was a bit dangerous for me, because 1. I LOVE WATERMELON, and 2. I made it a bit strong. Whoops!

Made Peanut Butter Chocolate Chip Banana Bread. Oh so good. That is my most recent cooking adventure, so I might go down and have a piece of it right now!
I know there is more that I made and experimented with, but these were just pictures of food I had on my phone.
Is there anything you'd like me to try to make? Anything you have always wanted to make at home, but were scared to try to make yourself? Let me know! I am always looking to try new things and to learn new techniques! It will also give me fodder for my blog!
Saturday, July 7, 2012
Lasagna Cupcakes?
You will soon come to learn of my love for Italian food and my love for cupcakes. Why not combine them?
The idea for this came to me while watching an episode of Best Thing I Ever Made on the Food Network. They were focusing on updated classic recipes. Aarti Sequeria made lasagna cupcakes on this episode, but with her own Indian flair to it, including things like cinnamon and mango chutney. Not that her recipe didn't look amazing, I wanted to go for something a little more traditional first.
Thankfully after a quick web search, and a bit of common sense I suppose, I found a recipe that looked easy and had the basic components of a tasty lasagna.

Lasagna Cupcakes
By: The Girl Who Ate Everything, but slightly adapted when prepared
1/3 pound ground beef
salt and pepper
36 wonton wrappers
1 3/4 cups grated Parmesan cheese
1 3/4 cups shredded mozzarella cheese
1 cup pasta sauce
basil for garnish (optional)
Preheat oven to 375 degrees. Spray muffin tin with cooking spray.
Brown beef, and season with salt and pepper. Drain.
Cut wonton wrappers into circle shapes (about 2 1/4 inches using a biscuit cutter or the top of a glass. (I decided to go with a more rustic look, and only cut 12 of the wonton wrappers just for the top and left them square for the first two layers.)
Reserve 3/4 cup Parmesan cheese and 3/4 cup mozzarella cheese for the top of your cupcakes. Start layering your lasagna cupcakes. Begin with a wonton wrapper and press it into the bottom of each muffin tin. Sprinkle a little Parmesan cheese, ricotta cheese, and mozzarella cheese in each. Top with a little meat and pasta sauce.


From here I used the remaining 12 wonton wrappers (the ones that had been cut) to be a topper to the cupcakes. I laid down the wrappers, but a thin layer of sauce, followed by some Parmesan cheese, then the mozzarella. I forgot to take a picture before I popped them into the oven because I was too excited.
Bake for 18-20 minutes or until edges are brown. Remove from oven and let cool for 5 minutes. To remove, use a knife to loosen the edges then pop each lasagna out.
Garnish with basil, if desired, and serve. Again, being too excited to eat this tasty delight, I forgot to garnish it with fresh basil from my herb garden. Crud. It was still awesome anyway.


The idea for this came to me while watching an episode of Best Thing I Ever Made on the Food Network. They were focusing on updated classic recipes. Aarti Sequeria made lasagna cupcakes on this episode, but with her own Indian flair to it, including things like cinnamon and mango chutney. Not that her recipe didn't look amazing, I wanted to go for something a little more traditional first.
Thankfully after a quick web search, and a bit of common sense I suppose, I found a recipe that looked easy and had the basic components of a tasty lasagna.

Lasagna Cupcakes
By: The Girl Who Ate Everything, but slightly adapted when prepared
1/3 pound ground beef
salt and pepper
36 wonton wrappers
1 3/4 cups grated Parmesan cheese
1 3/4 cups shredded mozzarella cheese
1 cup pasta sauce
basil for garnish (optional)
Preheat oven to 375 degrees. Spray muffin tin with cooking spray.
Brown beef, and season with salt and pepper. Drain.
Cut wonton wrappers into circle shapes (about 2 1/4 inches using a biscuit cutter or the top of a glass. (I decided to go with a more rustic look, and only cut 12 of the wonton wrappers just for the top and left them square for the first two layers.)
Reserve 3/4 cup Parmesan cheese and 3/4 cup mozzarella cheese for the top of your cupcakes. Start layering your lasagna cupcakes. Begin with a wonton wrapper and press it into the bottom of each muffin tin. Sprinkle a little Parmesan cheese, ricotta cheese, and mozzarella cheese in each. Top with a little meat and pasta sauce.


Layer one.
Repeat layers, ending with pasta sauce. Top with reserved Parmesan and mozzarella cheeses.


Layer two.
Bake for 18-20 minutes or until edges are brown. Remove from oven and let cool for 5 minutes. To remove, use a knife to loosen the edges then pop each lasagna out.
Garnish with basil, if desired, and serve. Again, being too excited to eat this tasty delight, I forgot to garnish it with fresh basil from my herb garden. Crud. It was still awesome anyway.

Look at those beauties!

I had to go for seconds!
Thursday, July 5, 2012
Pulled pork, homemade BBQ sauce and sesame green beans, OH MY!
It has become a bit of a tradition to end up with the Bishop women on Wednesday nights for dinner. Each week, we rotate who makes dinner among us, but a group of my friends normally ends up for food and good company.
By request, I decided to make pulled pork. I feel like there is almost nothing better than pulled pork, other than chocolate (of course). There is just something about it. I can never turn it down. Makes me wonder why I don't make it more.
I thought to myself, "Self? How can I push this pork idea a little further? How can I make it even more awesome?" The answer came to me in a dream....
Okay.. I lie, it wasn't a dream, but in the past I had made a Spicy Dr. Pepper Pulled pork which I adapted slightly from a recipe I had found by the Pioneer Woman. I didn't use quite as much of the chipolte peppers as she did and it was still a bit hot for me, so I decided to go a different route.
You'll soon learn that I am a bit of a wuss when it comes to spicy food.
After a short web search, I found a recipe that looked pretty good to me through My Retro Kitchen. Looking at the ingredients, it seemed like a good combo of ingredients that would lead to an awesome flavor. I was in it to win it.
Now another thing you will learn about me over time is that I am the biggest procrastinator on this side of the Mississippi River. I sat around and didn't do much of anything all Tuesday evening and realized around, ohh, midnight that I had not gone shopping for anything for the next day's meal.
I woke up bright and early and headed to the store prior to work but didn't have enough time before having to leave for work to prepare more than the sauce, so this became a collaborative effort with my sister. She was the one to set everything up in the crock pot to cook the meal. Thank goodness for that! Thought I would have to go without my pulled pork! That would have been tragic!
I was looking for a barbeque pulled pork. I could have gone the easy route and just used a store purchased sauce, but what fun is that. After another quick internet search, I found a recipe through Epicurious for a Dr. Pepper Barbeque Sauce. How fitting. It was a fairly easy process and the end result was glorious!
I also wanted to serve something relatively healthy with this meal (I try to incorporate veggies into my meals if I can). My sister made these tasty green beans about a year ago with red bell pepper and sesame seeds and I figured it would be a good pairing for this meal. Unfortunately, we couldn't find which cookbook she got the recipe from.
TO THE INTERNET! By simply putting in some of the ingredients I could remember, I found something similar that had been done by Rachel Ray on the Food Network. Awesome!

Dr. Pepper Pulled Pork in the Slow Cooker


Very carefully, because the pork will be hot, remove the meat from the slow cooker and place on a large cutting board. Using two forks, shred the pork by pulling away from each other. The meat should be very tender by this point. Place the shredded pork back into the slow cooker and continue to cook for an additional hour.
At this point, I added the barbeque sauce.


By request, I decided to make pulled pork. I feel like there is almost nothing better than pulled pork, other than chocolate (of course). There is just something about it. I can never turn it down. Makes me wonder why I don't make it more.
I thought to myself, "Self? How can I push this pork idea a little further? How can I make it even more awesome?" The answer came to me in a dream....
Okay.. I lie, it wasn't a dream, but in the past I had made a Spicy Dr. Pepper Pulled pork which I adapted slightly from a recipe I had found by the Pioneer Woman. I didn't use quite as much of the chipolte peppers as she did and it was still a bit hot for me, so I decided to go a different route.
You'll soon learn that I am a bit of a wuss when it comes to spicy food.
After a short web search, I found a recipe that looked pretty good to me through My Retro Kitchen. Looking at the ingredients, it seemed like a good combo of ingredients that would lead to an awesome flavor. I was in it to win it.
Now another thing you will learn about me over time is that I am the biggest procrastinator on this side of the Mississippi River. I sat around and didn't do much of anything all Tuesday evening and realized around, ohh, midnight that I had not gone shopping for anything for the next day's meal.
I woke up bright and early and headed to the store prior to work but didn't have enough time before having to leave for work to prepare more than the sauce, so this became a collaborative effort with my sister. She was the one to set everything up in the crock pot to cook the meal. Thank goodness for that! Thought I would have to go without my pulled pork! That would have been tragic!
I was looking for a barbeque pulled pork. I could have gone the easy route and just used a store purchased sauce, but what fun is that. After another quick internet search, I found a recipe through Epicurious for a Dr. Pepper Barbeque Sauce. How fitting. It was a fairly easy process and the end result was glorious!
I also wanted to serve something relatively healthy with this meal (I try to incorporate veggies into my meals if I can). My sister made these tasty green beans about a year ago with red bell pepper and sesame seeds and I figured it would be a good pairing for this meal. Unfortunately, we couldn't find which cookbook she got the recipe from.
TO THE INTERNET! By simply putting in some of the ingredients I could remember, I found something similar that had been done by Rachel Ray on the Food Network. Awesome!

The finished plate!
From: My Retro Kitchen (I followed her instructions exactly)
2 1/2-3 lb pork butt (also known as a pork shoulder)
24 oz. (2 cans) Dr. Pepper (or any caramel colored soda pop, each will provide a slightly different flavor)
1 medium onion, cut in quarters and then again in half
2 garlic cloves, minced
1 1/2 teaspoons dry ground mustard
1/4-1/2 teaspoon cayenne pepper (depending on personal taste.)
Salt and freshly ground black pepper
1/4 cup apple cider vinegar
3 tablespoons Worcestershire Sauce
BBQ Sauce of Choice (recipe below for Dr. Pepper BBQ Sauce if you are feeling ambitious)
Place the chopped onions in the bottom of the slow cooker. Place the pork butt on top of the onions and add the garlic, ground mustard, cayenne pepper, salt, pepper, apple cider vinegar and Worcestershire sauce. Pour the Dr. Pepper on top and cook on high for 4-5 hours (or on low for 8 hours).


Very carefully, because the pork will be hot, remove the meat from the slow cooker and place on a large cutting board. Using two forks, shred the pork by pulling away from each other. The meat should be very tender by this point. Place the shredded pork back into the slow cooker and continue to cook for an additional hour.
At this point, I added the barbeque sauce.
Dr. Pepper Barbeque Sauce
By: Elizabeth Karmel, found on Epicurious (I actually doubled the recipe from what is shown)
4 tablespoons (1/2 stick) unsalted butter
1 large yellow onion, chopped
4 cloves garlic, chopped
1 cup ketchup
3 tablespoons tomato paste
One 12 ounce can Dr. Pepper (although I'm sure a different flavor will result from any type of soda)
1/2 cup cider vinegar
1/3 cup Worcestershire sauce
1/2 cup packed dark brown sugar
2 teaspoons ancho or New Mexican chili powder (I had neither of these, so just used what I had)
1 teaspoon fine-ground white pepper
1 teaspoon kosher salt
In a heavy saucepan, melt the butter. Sauté the onion and garlic in the
butter until translucent, about 10 minutes. Add all the remaining
ingredients and simmer for about 15 minutes, until the flavors have
blended. Continue cooking until the sauce begins to thicken, 20 to 30
minutes. Taste and adjust the seasonings with salt and pepper if
desired.
Let the sauce cool for about 10 minutes or until it is warm but no
longer “boiling” hot. Puree with an immersion or traditional
blender—this will make the sauce thicker. Let cool. The sauce will keep,
tightly covered, in the refrigerator for up to 2 weeks.
Brush it on food 5 to 15 minutes before the cooking time is finished, or in this case add to the shredded pork to desired sauciness.

Who doesn't love butter?

Butter cooked onions and garlic. By this point, the kitchen smelled amazing with just the three ingredients

Everything bubbling away.

After I ran the immersion blender through it to smooth it up.

I told you it was glorious!

I even had leftovers, but I had doubled the recipe.
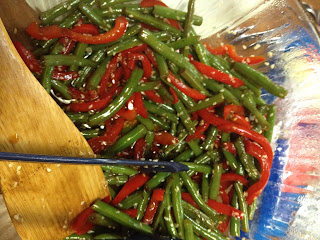
Sesame-Soy Green Beans and Peppers
By: Rachel Ray from her show 30 Minute Meals titled "Meat and Potatoes, International Edition"
3/4 pound green beans, trimmed
Salt
2 tablespoons vegetable oil, 2 turns of the pan
1 red bell pepper, seeded and thinly sliced
3 tablespoons tamari aged soy sauce
2 teaspoons sesame oil
1 tablespoon sesame seeds
Salt
2 tablespoons vegetable oil, 2 turns of the pan
1 red bell pepper, seeded and thinly sliced
3 tablespoons tamari aged soy sauce
2 teaspoons sesame oil
1 tablespoon sesame seeds
Cut green beans into 2-inch pieces on an angle. Place in a skillet. Add water, salt, to taste and cook beans 5 minutes, then drain beans. Place the skillet back on stove and add vegetable oil. Heat pan over high heat until oil smokes. Add the beans and red peppers and stir-fry 2 minutes (I used a wok instead of a regular skillet which made this process much easier). Add the soy and sesame oil and transfer to a serving dish. Garnish with sesame seeds and serve.

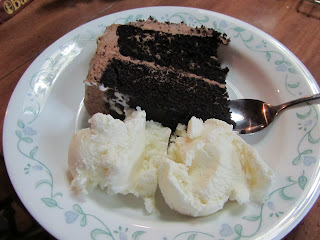
Chocolate Cake Cravings
I had been fiending for chocolate cake for the past few weeks. I tried to satisfy my craving at various restaurants, but they really weren't what I was looking for. I've been trying to find a rich chocolate cake that isn't fudgy. If I wanted fudgy, I would have gotten brownies. Apparently that is too much to ask! If you want something, you just have to do it yourself I guess.
The mother of an ex-boyfriend of mine used to make this delicious chocolate cake, and I knew she put coffee in it, so in a quick, I found a recipe from the Barefoot Contessa, Ina Garten. Her recipes always look so tasty. I didn't make any alterations to her recipe.


Beatty's Chocolate Cake
as shown on "Barefoot Contessa" with Ina Garten on her episode titled "Flavors and Flowers"
Ingredients
Butter, for greasing the pans
1 3/4 cups all-purpose flour, plus more for pans
2 cups sugar
3/4 cups good cocoa powder
2 teaspoons baking soda
1 teaspoon baking powder
1 teaspoon kosher salt
1 cup buttermilk, shaken
1/2 cup vegetable oil
2 extra-large eggs, at room temperature
1 teaspoon pure vanilla extract
1 cup freshly brewed hot coffee
Chocolate Buttercream, recipe follows
Directions
Preheat the oven to 350 degrees F. Butter two 8-inch x 2-inch round cake pans. Line with parchment paper, then butter and flour the pans.
Sift the flour, sugar, cocoa, baking soda, baking powder, and salt into the bowl of an electric mixer fitted with a paddle attachment and mix on low speed until combined. In another bowl, combine the buttermilk, oil, eggs, and vanilla. With the mixer on low speed, slowly add the wet ingredients to the dry. With mixer still on low, add the coffee and stir just to combine, scraping the bottom of the bowl with a rubber spatula. Pour the batter into the prepared pans and bake for 35 to 40 minutes, until a cake tester comes out clean. Cool in the pans for 30 minutes, then turn them out onto a cooling rack and cool completely.
Place 1 layer, flat side up, on a flat plate or cake pedestal. With a knife or offset spatula, spread the top with frosting. Place the second layer on top, rounded side up, and spread the frosting evenly on the top and sides of the cake.
Chocolate Frosting:
6 ounces good semisweet chocolate
1/2 pound (2 sticks) unsalted butter, at room temperature
1 extra-large egg yolk, at room temperature
1 teaspoon pure vanilla extract
1 1/4 cups sifted confectioners' sugar
1 tablespoon instant coffee powder
Chop the chocolate and place it in a heat-proof bowl set over a pan of simmering water. Stir until just melted and set aside until cooled to room temperature.
In the bowl of an electric mixer fitted with a paddle attachment, beat the butter on medium-high speed until light yellow and fluffy, about 3 minutes. Add the egg yolk and vanilla and continue beating for 3 minutes. Turn the mixer to low, gradually add the confectioners' sugar, then beat at medium speed, scraping down the bowl as necessary, until smooth and creamy. Dissolve the coffee powder in 2 teaspoons of the hottest tap water. On low speed, add the chocolate and coffee to the butter mixture and mix until blended. Don't whip! Spread immediately on the cooled cake.
The mother of an ex-boyfriend of mine used to make this delicious chocolate cake, and I knew she put coffee in it, so in a quick, I found a recipe from the Barefoot Contessa, Ina Garten. Her recipes always look so tasty. I didn't make any alterations to her recipe.

My less than fabulous icing job.

Oh my that looks good...

Chocolate cake without vanilla ice cream would be madness.
Beatty's Chocolate Cake
as shown on "Barefoot Contessa" with Ina Garten on her episode titled "Flavors and Flowers"
Butter, for greasing the pans
1 3/4 cups all-purpose flour, plus more for pans
2 cups sugar
3/4 cups good cocoa powder
2 teaspoons baking soda
1 teaspoon baking powder
1 teaspoon kosher salt
1 cup buttermilk, shaken
1/2 cup vegetable oil
2 extra-large eggs, at room temperature
1 teaspoon pure vanilla extract
1 cup freshly brewed hot coffee
Chocolate Buttercream, recipe follows
Directions
Preheat the oven to 350 degrees F. Butter two 8-inch x 2-inch round cake pans. Line with parchment paper, then butter and flour the pans.
Sift the flour, sugar, cocoa, baking soda, baking powder, and salt into the bowl of an electric mixer fitted with a paddle attachment and mix on low speed until combined. In another bowl, combine the buttermilk, oil, eggs, and vanilla. With the mixer on low speed, slowly add the wet ingredients to the dry. With mixer still on low, add the coffee and stir just to combine, scraping the bottom of the bowl with a rubber spatula. Pour the batter into the prepared pans and bake for 35 to 40 minutes, until a cake tester comes out clean. Cool in the pans for 30 minutes, then turn them out onto a cooling rack and cool completely.
Place 1 layer, flat side up, on a flat plate or cake pedestal. With a knife or offset spatula, spread the top with frosting. Place the second layer on top, rounded side up, and spread the frosting evenly on the top and sides of the cake.
Chocolate Frosting:
6 ounces good semisweet chocolate
1/2 pound (2 sticks) unsalted butter, at room temperature
1 extra-large egg yolk, at room temperature
1 teaspoon pure vanilla extract
1 1/4 cups sifted confectioners' sugar
1 tablespoon instant coffee powder
Chop the chocolate and place it in a heat-proof bowl set over a pan of simmering water. Stir until just melted and set aside until cooled to room temperature.
In the bowl of an electric mixer fitted with a paddle attachment, beat the butter on medium-high speed until light yellow and fluffy, about 3 minutes. Add the egg yolk and vanilla and continue beating for 3 minutes. Turn the mixer to low, gradually add the confectioners' sugar, then beat at medium speed, scraping down the bowl as necessary, until smooth and creamy. Dissolve the coffee powder in 2 teaspoons of the hottest tap water. On low speed, add the chocolate and coffee to the butter mixture and mix until blended. Don't whip! Spread immediately on the cooled cake.
Saturday, May 19, 2012
Grilled Pizza?!?
I had taken some time off of work, and coupled with my three day weekend, was going to have a nice little break prior to my next semester's classes that happen to start on June 4. I decided to use this time to bring together some friends and experiment with my new grill. I'm not sure how the idea got stuck in my head, but grilling pizza sounded like a fantastic idea (and I suggest doing it on a regular basis). I did some research and happened to find that a blog I followed also decided to do the same thing in the past. Knowing that Annie has not failed me in the past, I decided to work based off of her suggestions.
Now the dough was relatively easy, having only 5 ingredients (bread flour, salt, water, olive oil and yeast), but I found I had to alter her recipe slightly. Although it is said the baking is mostly precise, I've found that sometimes there can be variations, especially in how others measure flour. Now I remember back from Home Economics class in high school that the instructor stressed that when measuring flour, that you just don't scoop or pack the flour into the measuring cup, but rather measure the flour by spooning it into the measuring cup and leveling it off. Now that's the way I normally work. With that said, I went about following the recipe and ended up with what seemed to be a non-workable dough. It was still quite moist and very sticky and was hard to work with. Here it is in the bowl still being mixed.


Now the dough was relatively easy, having only 5 ingredients (bread flour, salt, water, olive oil and yeast), but I found I had to alter her recipe slightly. Although it is said the baking is mostly precise, I've found that sometimes there can be variations, especially in how others measure flour. Now I remember back from Home Economics class in high school that the instructor stressed that when measuring flour, that you just don't scoop or pack the flour into the measuring cup, but rather measure the flour by spooning it into the measuring cup and leveling it off. Now that's the way I normally work. With that said, I went about following the recipe and ended up with what seemed to be a non-workable dough. It was still quite moist and very sticky and was hard to work with. Here it is in the bowl still being mixed.

Again knowing that Annie has not steered me wrong, I trusted her, and went about the process, placed it in an oiled bowl, covered with with saran wrap and let it rise for about two hours. It all seemed well.

As you can see, I also made another batch of the dough. For that batch, I just scooped the flour out using the measuring cup, and still felt it needed more than the recipe called for (fairly certain I must have added an extra half cup to the recipe. Once risen, that one looked a bit differently.

Now while the dough was rising, I decided to make Peach Sangria to accompany my pizza, after a friend on Facebook asked if someone could figure out how to make it. Again, I searched the internet for suggested recipes for said sangria. Some of them called for a white table wine and to use Lemonade concentrate, which I found a bit odd. I wasn't having that. What I ended up doing was using a white wine, peach schnapps, lemon lime soda, and a peach-pinapple puree I made. Oh, and I sliced up some fresh peaches to put in it, of course! I've been told that It was "on point!" so I must have done something right!
Okay, now back to star of the show. After the dough had risen, I split it up into eight portions per batch of down. The first batch was a bit messy, but I made it work. By proportioning it out prior to being at the grilling station, I definitely saved myself a headache.

Looking good! So, at this point, it was time to grill. I had already gathered my toppings, you know whatever you like to eat on a pizza, and was ready to go. What I had done was hand stretched the dough right before putting it on the grill, but I'm sure if you wanted to be more precise, you would always use a rolling pin to roll it out.


I liked doing it this way because I liked the rustic shape. Now what I had found to do was just to brown one side of the dough at first, so I did that for all the dough-balls first and set them to the side. Then I put the toppings on the cooked side and finish up the other side of the dough. It was fantastic.

Cheese and Pepperoni Pizzas

BBQ Chicken Pizza with peppers and onions!!!!!!


They were too big for my plates!

Can't forget a shot of the Peach Sangria (we already hit that up before I remembered to take a picture... Whoops!
What a tasty meal and a great way to spend time with my family and friends!
Grilled Pizza
Now this recipe was taken from Annie-Eats and adapted to work with what worked for me. Now I hadn't noticed that her recipe also had a weight measurement until right now, so maybe had I tried that, I would have had a more consistent recipe. That's okay, maybe next time!
Pizza Crust
½ cup warm water (about 110°)
1 envelope (2 ¼ tsp.) instant yeast
1 ¼ cups water, at room temperature
2 tbsp. extra-virgin olive oil
4 cups (22 oz.) bread flour, plus more for dusting
1 ½ tsp. salt
olive oil or non-stick cooking spray for greasing the bowl
Directions:
Measure the warm water into a 2-cup liquid measuring cup. Sprinkle in the yeast and let stand until the yeast dissolves and swells, about 5 minutes. Add the room temperature water and oil and stir to combine. I tried to make sure I stirred it up really well, especially right before I poured it into the dry ingredients.
Place the flour and salt in the bowl of a stand mixer fitted with the paddle attachment. Briefly combine the dry ingredients at low speed. Slowly add the liquid ingredients and continue to mix at low speed until a cohesive mass forms. Stop the mixer and replace the paddle with the dough hook. Knead until the dough is smooth and elastic, about 5 minutes. Form the dough into a ball, put it in a deep oiled bowl, and cover with plastic wrap. Let rise until doubled in size, about 1 ½ to 2 hours. Press the dough to deflate it.
Now this recipe can be used to bake regular pizzas in the house too, so don't reserve it just for grilling.
At this point, I portioned the dough in to eight dough balls, and coated them with flour, covered them, and set them aside until I was ready to grill (be careful not to let them sit for more than 30 minutes).
Preheat your grill to a medium-high heat. Once heated, oil the grates. I wadded up paper towels and put them into olive oil and spread it over the grates. I suggest using tongs when doing this, or you will get burned (ouch).
When ready to use, either hand stretch the dough into whatever shape you can get them into, being careful not to stretch a hole into the middle or drop it on the ground. The dough is sneaky and ultimately would rather be on the ground that in your hands. I had to use both hands and arms to prevent any casualties. Now you can roll them out with a rolling pin if you would like, but I felt like hand stretching was more fun.
As you stretch the dough, place it on the already heated grill, and move on to the next dough-ball. You will see the dough start to bubble a bit, so use tongs or a turner to move them slightly to make sure it cooks evenly. The dough should release fairly easily from the grill making it easy to move.
When you get some good grill marks on the bottom, move the dough from the heat. The other side will get cooked once the toppings are on.
Now the most important part, the toppings!!
Sauces
You can use any of the following to your liking: Marinara, BBQ sauce, buffalo sauce, Basil Pesto, alfredo sauce, garlic butter sauce. The options are endless.
Toppings
Again, use any of the following to your liking: Cheese (mozzarella, cheddar, parmesan, blue cheese, feta, etc.), vegetables (mushrooms, tomatoes, peppers, onions, olives, etc), Meats, if you are into that (pepperoni, shredded chicken or pork, ham, sausage, bacon, etc).
So many options, so many flavors, so much fun.
Peach Sangria
1 bottle (750 ml) white wine of your choice
3/4 cup peach schnapps
2 cups frozen peaches (approximately)
1 cup pineapple juice (approximately)
8 ouces lemon lime soda (approximately)
2 fresh peaches, pitted, peeled and sliced
Now this is fairly easy. I opened the bottle of wine and put it into a two quart pitcher. Now, I used moscato wine, from Cupcake Vineyards to be exact. I like sweet, less grape-y wines, so I highly suggest using moscato wine for this, but it is all a matter of taste. I then added the peach schnapps. Now keep in mind that I eyeballed the measurement of the schnapps, so it is all a matter of taste.
I used the frozen peaches and pineapple juice the make a peach puree. I put the peaches and juice into the blender and liquified it. Once in a liquid state, put right into the pitcher with the wine mixture. Add the lemon lime soda and stir to combine. Now it's going to be a bit frothy, but don't worry. It will settle down.
Add the sliced peaches and give it a final stir and pop it into the refrigerator for at least 2 hours, to give the fruit time to flavor the sangria and the wine and schnapps time to do it's magic on the fruit. Serve chilled and enjoy!
Subscribe to:
Posts (Atom)